Guide - Uploading Files (i.e. PDFs)
Uploading Files
When you upload files into your CMS, they end up in the Media Library, no matter how you upload them.
There are three ways to upload files into your website. These three methods are described below.
-
Local Upload
- Use this method when you wish to add or change files in one page or application.
-
Media Upload
- Use this method when you are uploading many files, and you need to put them into multiple folders.
-
Anonymous Upload
- Use this method to bypass the CMS so that you can simply upload your files to our team to build your website.
This is how you upload or update a file for use directly in a Page, FAQ, News Post, Calendar Event, or other application.
-
Open the page or application where you want the file linked. If you are not sure where the page is, then use the search in the upper right of the CMS.
-
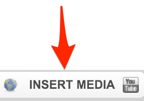
Click the “Insert Media” button on the editor toolbar while editing the page (or application).
-
The file manager will open in a popup window.
-
Open the folder where you want the file to be uploaded to, or create a new folder using the "New Folder" link in the upper right.
-
On your local computer, find the file you wish to upload using your local file manager.
-
Drag the file from your computer to the media library in the popup to upload it.
-
To select multiple files, hold the CTRL key.
-
You can upload up to 150 files at a time.
-
The max file size is 250MB per file. Allow longer upload times for larger files.
-
Choose the file from the file manager, or upload a new one by dragging it into the file manager popup to upload it.
-
Hover over the file, and click the “+” sign to insert it.
-
Click blue Insert button.
-
File hyperlink appears in the page, and you can rename it as you like.
-
Click save to save the page or app.
This is how you mass-upload files for use across your website, by interacting directly with the Media Library.
Note: We recommend that you create separate folders for each of your departments in the Media Library.
-
Click "Media" on the left in the CMS.
-
Browse to the target folder where you wish to upload files to. If you need to create a new folder, use the "New Folder" link.
-
Double-Click on the folder you wish to upload files to.
-
On your local computer, find the file you wish to upload using your local file manager.
-
Drag the file from your computer to the media library in the popup to upload it.
-
To select multiple files, hold the CTRL key.
-
You can upload up to 150 files at a time.
-
The max file size is 250MB per file. Allow longer upload times for larger files.
Websites on the Evo Cloud CMS that are being constructed have an anonymous upload function.
This makes it possible to upload files and make folders in your media library, so that you don't have to use Dropbox.com, OneDrive, or Google Drive to send files to your website.
To access your anonymous (no login required) uploader, simply go to your website's domain name and add "/evo_upload/" to the end of the URL.
This will open the media library without logging in, and you can drag your files into the Media Library.
